weeks as we’ve had a new fence put up to dog proof the garden (there were so
many bits that they could have escaped from if they’d wanted to.) We’ve dug up
trees and bushes, we’ve cleared weeds and shrubs, we’ve un-earthed a lot more
space that needs to be grassed over. And whilst the garden area isn’t quite totally done, one of the projects that I have completed is ready to show you – our garden furniture
makeover.

Our garden furniture was a freebie from one of the bars I
used to work for (hence the Kopparburg branding on the side) so it wasn’t new when we got it but as they were updating
their outside furniture and we’d just bought a house it seemed like was perfect timing (plus, have you seen how much garden furniture costs!).
But this will be the 3rd year of the set sitting out in the garden
and the weather was starting to take its toll as we’ve not had it covered
or protected in any way. The wood was starting to age and the metal edge of
the table was rusted to the point it left dirty marks on your jeans. Not ideal. So I
started to look around for a solution.

about a product called ‘Hammerite paint to rusted metal’ paint which, as the cliché
goes – does exactly what it says on the tin – it paints right onto rusted
metal, no priming. And being the lazy DIY-er that I am, this is perfect for me so
I picked up a can of the Hammered Finish in Black at B&Q for about £9.
the table. The tin says it covers 5sq meters. Honestly I have no idea
actually what this is in respect to the metal on the garden set but the tin did
2 full covers of the set, with a little bit left over that I painted on random bits of the outhouse. I did one coat on a Friday
night when I got home from work (rock and roll). I took the dogs to the park whilst it dried, had a G&T and
then did the other coat before the light left me for the day. Before I painted,
I did wire brush most of the metal lightly to just get rid of any big bits of
rust, but I didn’t do any other prep and 2 coats made the metal look pretty
amazing. And I’ve been telling everyone I know about this paint. Who knew it
was this easy to get rid of rust?

chatted to Jim about my plans, and his only feedback was that I wasn’t to paint it pink. Obviously
before he’d said this my brain was heading straight for a flamingo pink for the
set, but I guess he has to use the garden too, so I really ought to pay a
bit of attention to him sometimes. Which meant the next stop in my brain was
turquoise.
favourite turquoise ring, called ‘Seize the day’. This paint is one of the
shades available as a wood paint, but I also got way laid by the other shades
on the same row of paint. They aren’t actually available as wood paint, but
they do come in masonry paint, and after chatting to the paint guy, I thought I’d
give it a go.

paint, in a gradient of shades of turquoise – from light to dark – Cerulean Sea, Scuba in Aruba (anyone elses’ brain go to a Friends episode here?), Seize the Day, Mayan Bubbles and Caribbean Girl. The wood paint tester was £5 a pot, and the
masonry paint testers were £2.50, so it’s a really cheap DIY (I also bought
some really cheap, £3 a set, own brand brushes so that I could throw them away
afterwards because I hate cleaning paint brushes).

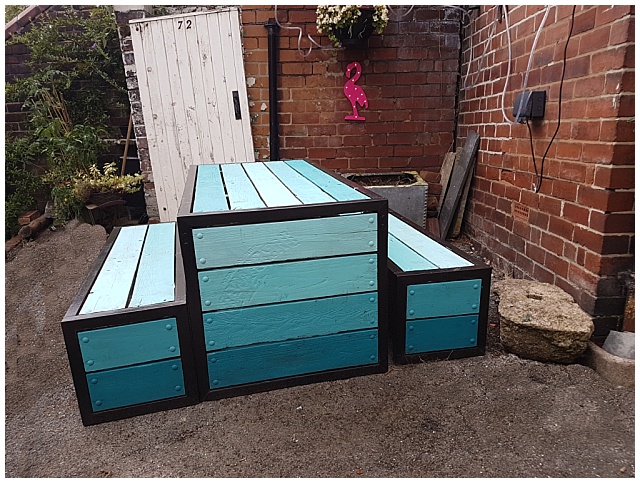
And well, you can see what I did with it can’t you!
lightest one might be a bit too pale for a table outdoors.
Starting with the darkest shade ‘Cerulean Sea’ (to combat the dust and dirt that will inevitably
build up on the floor) I painted the slats on the sides of the table in the
various shades. To guard the newly painted metal I slotted in ripped up bits of
fliers that come through the door with the WI magazine (they finally came in
useful!) but if I’d been more prepared I would have masking taped it just to
stop the coloured paint ruining my handy work.

A couple of hours later, for less that £30, I had an ombre garden table in
my favourite shades of turquoise. And I couldn’t be happier. I really love it.
And Jim loves it. And it looks so much smarter than it did before I painted it. Now to see how the masonry paint holds up on wood.